
How To: Pumpkin Head Photoshoot Prep Guide
- Cienna So
- Aug 2, 2024
- 3 min read
Updated: Aug 2

It’s (almost) Halloween season, which means the cutest photography trend is making a comeback! In this blog, I’ll share my own photos from this session and provide you with all the tips and tricks I’ve gathered over the years while offering the Pumpkin Head Photoshoot to my clients. Get ready to capture some adorable moments!

PSSSP.... If you find this guide helpful, I’d love for you to give it a thumbs up at the bottom! Your support truly means a lot to me. And if you do a photoshoot like this, feel free to share your photos in the comments below!
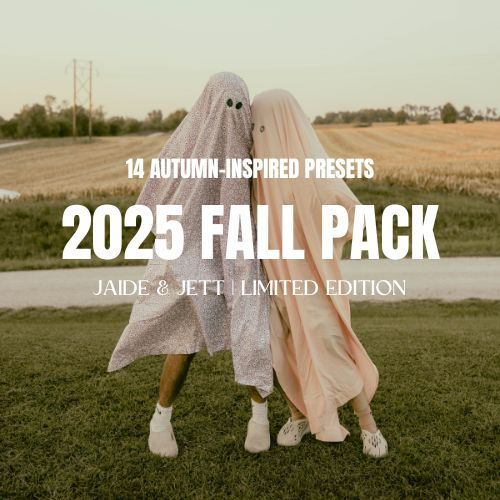
Want edits like mine? Check out my new 2025 Fall Lightroom Preset Pack
Before you grab a pumpkin and head to the woods, make sure you have the presets to match. The 2025 Fall Pack is what I use for all my Halloween edits. It’s bold, warm, and built to make your colors pop.
What is a Pumpkin Head Photoshoot?
A Pumpkin Head Photoshoot is a quirky and creative photo session where people wear carved pumpkins as masks or headpieces, often styled with fall outfits or spooky themes. These shoots have become a halloween tradition for some of us and are perfect for capturing unique, Instagram-worthy moments before Halloween.

Downtown Pumpkins


Pumpkin Head Photoshoot by Cienna So Photo
Love photography? Follow our Instagram ⭐️ 📸
Discover stunning artistic creations and gain inspiration from photographers across the globe.

Picking Your Pumpkin
First things first, you need to find the perfect pumpkin. When choosing your pumpkin, make sure it's big enough to fit over your head. Pay attention to the height, weight, and width of your pumpkin. It's ideal to pick a pumpkin that is tall enough to touch your shoulders. If not, your head will take on all the weight of the pumpkin.

Carving Your Pumpkin
It's time to get creative and bring your pumpkin to life! Here are a few tips to ensure you carve your pumpkin correctly and stay comfortable during your photoshoot.
Carve a hole in the bottom of the pumpkin large enough for easy removal.
Scoop all the pumpkin flesh OUT! I did not realize how heavy pumpkins were until my Pumpkin Head Photoshoot.
Clean the inside of your pumpkin with a towel until dry.


Take Your Pumpkin Head Photos to the Next Level with Editing
Once you’ve got your Pumpkin Head shots, it’s time to bring them to life with some creative editing! You can amp up the spooky vibes by playing with shadows and contrast or keep it cozy with warm autumn tones. If you really want to add that cinematic flair, my Jaide and Jett Presets are perfect for making your photos pop. Whether you’re going for eerie or dreamy, these presets will save you time and help you nail the perfect look.
Pumpkin Head Photoshoot Tips
Here is a list of all the tips/tricks I can think of when it comes to the Pumpkin Head Photoshoot.
What you should do :
Pick a pumpkin large enough for your head.
Mark where your facial features are on the pumpkin prior to carving.
Pick a fun expression for your jack-o-lantern.
Carve a hole in the bottom of your pumpkin.
Wipe your pumpkin thoroughly with a towel until dry.
Wear a shower cap/stocking hat to protect head/hair during photoshoot.

How to : Pumpkin Head Photoshoot Prep Guide
If you found this guide helpful, I’d love for you to give it a thumbs up at the bottom! Your support truly means a lot to me. And if you do a photoshoot like this, feel free to share your photos in the comments below!
Join our Facebook Group for Photographers for more photography tips and tricks.
Ready to edit your pumpkin head photos like a pro? The 2025 Fall Pack was made for this. Warm tones, vintage Halloween vibes, and bold color that makes your photos stand out. It’s only available until October 31, so don’t miss it. Shop here


コメント